Wheel alignment is one of those vehicle maintenance services that drivers often overlook — until they notice uneven tire wear, steering drift, or handling issues. But the choice of alignment technique matters: advanced options (like laser or computerized 4-wheel alignment) promise greater precision and performance benefits.
Table of Contents
- What Is Wheel Alignment — Basics & Key Angles
- Standard (Conventional) Alignment Methods
- Four-Wheel Alignment: The Modern Standard
- Laser Alignment (Computerized / Optical / 3D)
- Comparative Analysis: Laser vs Standard
- Advantages & Limitations of Each Method
- When to Use Four-Wheel Laser vs Standard Alignment
- Vehicle Types, Suspension Designs & Alignment Needs
- Process Walkthrough: From Setup to Verification
- Calibration, Accuracy & Error Sources
- Cost, Time, and Business Considerations
- Best Practices & Tips for Alignment Technicians
1. What Is Wheel Alignment — Basics & Key Angles
Before contrasting methods, it's critical to understand what alignment is and which angles are involved.
1.1 Definition & Purpose
Wheel alignment (also called tracking) refers to adjusting the angles of the vehicle’s wheels to the manufacturer’s specifications so they make optimal contact with the road. Proper alignment ensures:
- Uniform tire wear
- Stable steering, no drift or pull
- Better fuel economy
- Predictable handling
1.2 Key Alignment Angles / Parameters
There are three primary geometric parameters:
- Camber: Tilt of the wheel inwards or outwards when viewed from the front.
- Caster: Forward or rearward tilt of the steering axis, as seen from the side.
- Toe: Whether the front (or rear) of each wheel is angled inward (toe-in) or outward (toe-out).
Additionally, there is thrust angle or thrust line (in 4-wheel alignment) which indicates the direction in which the rear axle is pointing relative to the vehicle’s centerline.
These angles interact: changing one may affect others. A good alignment job sets all appropriate angles within factory tolerances and ensures wheel symmetry.
2. Standard (Conventional) Alignment Methods
“Standard alignment” broadly refers to more traditional alignment techniques, which may include mechanical gauges, optical systems, or non-laser setups. Let’s break down how these have worked historically and currently.
2.1 Mechanical & Optical Alignment
In older systems, alignment would be done using:
- String alignment (strings run parallel along sides of car, measure wheel offset)
- Bubble gauges
- Camber/caster gauges
- Optical systems using beams of light and mirrors
These methods can be effective, especially when done by experienced technicians, but are more manually intensive and susceptible to setup errors.
2.2 Conventional 2-Wheel / Front-End Alignment
In many vehicles, particularly those with fixed rear axle or solid rear suspensions, alignment traditionally focused on the front wheels only. The process would:
- Verify the rear axle is essentially straight or within acceptable limits.
- Adjust the front toe, camber, and caster to steer in line with rear.
This is sometimes called a “front-end alignment.” It assumes the rear is set or non-adjustable.
2.3 Limitations of Conventional Methods
- Accuracy is limited by measuring tools, operator skill, and setup error
- Adjustments are slower and involve more manual steps
- Less able to detect subtle misalignments in rear or multiple axes
- Harder to correct for thrust angle or rear toe on independent suspensions
These limitations drive demand for more precise methods, especially in modern, tightly toleranced vehicles.
3. Four-Wheel Alignment: The Modern Standard
Four-wheel alignment adjusts all four wheels (front and rear) relative to each other and the vehicle’s centerline. It is considered the more comprehensive and modern standard, especially for cars with independent rear suspension or all-wheel drive.
3.1 Definition & Scope
A four-wheel alignment ensures that:
- The rear wheels’ camber/toe are adjustable and set properly
- The front wheels align relative to the rear (not just assumption)
- The thrust angle or rear axle direction is within spec
- All wheels work in harmony
This is important where rear geometry is adjustable or where rear alignment errors can significantly affect handling or tire wear.
3.2 Why Many Modern Vehicles Require 4-Wheel Alignment
- Many cars now have independent rear suspensions, making toe/camber adjustable on rear wheels
- Vehicles with all-wheel drive or 4WD demand symmetrical alignment front and rear
- Rear misalignment can lead to pronounced handling and wear issues on modern vehicles
Thus, vehicle manufacturers often specify 4-wheel alignment in service manuals.
3.3 Adjusted Parameters in 4-Wheel Alignment
In a four-wheel alignment, technicians typically must handle:
- Front camber, caster, toe
- Rear camber, toe
- Thrust or rear axle angle
- Sometimes cross camber or cross caster
Each adjustment may require different suspension link adjustments or shims.
4. Laser Alignment (Computerized / Optical / 3D)
Laser alignment (or computerized / optical / 3D alignment) is a method that leverages modern sensors, lasers, cameras, and computation to deliver faster and more precise readings. It often forms the backbone of modern 4-wheel alignment systems.
4.1 What “Laser Alignment” Means
While the terminology varies, “laser alignment” typically refers to using laser or optical sensors, camera heads, or light beams in conjunction with a computer to assess wheel angles rather than relying solely on mechanical gauges.
These systems may also be called 3D alignment, computerized alignment, or optical alignment systems.
4.2 Components of a Laser / Computerized System
- Sensor “heads” or targets mounted on wheels (reflectors, mirrors, or optical sensors)
- Cameras or lasers measuring deviation from reference positions
- A central processing unit or alignment computer, holding reference specs and calculating offsets
- Software interface and display
- Adjustment capabilities, live readouts, and automatic correction feedback
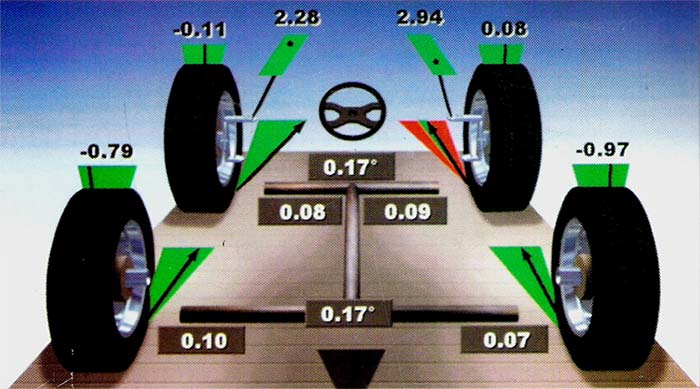
4.3 How Laser / Computerized Readings Work
- The system establishes a reference baseline using optical sensors
- Targets measure wheel angles relative to that baseline
- The computer computes camber, caster, toe, and thrust
- Some systems provide guidance (visual cues) for adjustments
Because it automates many measurement steps, it reduces human error and accelerates the process.
5. Comparative Analysis: Laser vs Standard
Let’s directly compare four-wheel laser (or computerized) alignment with standard / conventional alignment techniques across multiple dimensions.
| Criteria | Four-Wheel Laser / Computerized Alignment | Standard (Mechanical / Optical / Manual) |
|---|---|---|
| Accuracy & Precision | High — sensors, computation, digital calibration; capable of finer tolerances | Moderate — limited by tool accuracy, human error, setup errors |
| Speed & Efficiency | Faster — real-time readouts, quicker measurement | Slower — manual adjustments, repeated measurements |
| Repeatability & Consistency | Better — less operator dependence | Variable — dependent on technician skill |
| Ability to Adjust All Four Wheels | Native support for full 4-wheel alignment | May be limited or require additional tools |
| Error Detection & Diagnostics | Can detect subtle misalignments, cross angles, thrust, etc. | Harder to detect hidden misalignments |
| Cost of Equipment / Setup | Higher (cameras, sensors, calibration, computer) | Lower (mechanical gauges, mirrors) |
| Maintenance / Calibration | Requires periodic calibration and care | Relatively minimal maintenance |
| Applicability to Modern Vehicles | Well suited for independent suspensions and tight specs | Less ideal for modern systems |
Because of these advantages, laser or computer-assisted methods are increasingly considered the benchmark.
6. Advantages & Limitations of Each Method
No method is perfect. Below is a deeper look at strengths and limitations.
6.1 Strengths of Four-Wheel Laser / Computerized Methods
- High Precision: Able to detect deviations of fractions of a degree.
- Reduced Human Error: Much of the measurement is automated.
- Speed: Faster measurement, setup, adjustment, confirmation cycles.
- Comprehensiveness: Supports full 4-wheel alignment, detection of thrust angle and cross angles.
- User-Friendly Interface: Technicians can see real-time feedback and guidance.
- Data Storage & Reporting: Many systems allow saving alignment history, reports for clients, comparison.
6.2 Limitations & Challenges of Laser / Computerized Methods
- Initial Equipment Cost: High capital investment in sensors, cameras, software.
- Calibration Sensitivity: Must be regularly calibrated; damage to sensor heads or drops may cause inaccuracies.
- Dependent on Setup: Poor rack leveling, bad sensor mounting, or mis-calibrated reference planes can degrade results.
- Less “Hands-On” Flexibility: In some unusual or modified vehicles, manual insight may sometimes offer advantage.
- Learning Curve: Technicians must understand system nuances and potential error sources.
6.3 Strengths of Standard / Manual Methods
- Lower Cost: Equipment is relatively inexpensive.
- Flexible: Technicians may adapt on unusual builds or nonstandard setups.
- Reliance on Skill: A highly skilled technician can often compensate for limitations.
- Simplicity: Less reliance on electronics, software, or calibration (though still critical).
6.4 Limitations of Standard / Manual Methods
- Susceptible to Human Error: Setup breeze, misreading gauges, incremental error.
- Slower Process: Repeated measurement cycles can slow job throughput.
- Limited Diagnostic Insight: Harder to detect cross thrusts, subtle misalignments or asymmetries.
- Less Suitable for Modern Vehicles: May struggle to meet tight factory specs or adjust rear geometry.
7. When to Use Four-Wheel Laser vs Standard Alignment
It’s one thing to know the differences; it’s another to know when each is appropriate.
7.1 Use Four-Wheel Laser Alignment When:
- The vehicle has independent rear suspension or rear alignment adjustability
- The vehicle is all-wheel drive (AWD / 4WD)
- You want maximum precision, especially in performance or luxury vehicles
- You care about reporting, documentation, and repeatability
- Your workshop handles many alignment jobs, justifying the capital cost
- You have a modern shop setup with proper calibration procedures
7.2 Use Standard Alignment / Manual Methods When:
- The vehicle has a solid fixed rear axle without adjustability
- You are handling basic front-end alignment jobs
- Budget or workshop scale doesn’t support high-end equipment
- The vehicle is older, vintage, or modified in ways that conventional methods allow flexibility
In many real-world shops, a hybrid approach is common: standard methods for routine jobs, and laser/computerized for premium jobs.
8. Vehicle Types, Suspension Designs & Alignment Needs
Alignment needs vary a lot with suspension design, drivetrain, and vehicle type.
8.1 Solid Rear Axle / Non-adjustable Rear
Older trucks, pickup vans, and some traditional models use a solid beam or fixed rear axle. In such vehicles:
- Rear geometry is non-adjustable
- Alignment focuses mainly on front toe/camber
- Rear “tracking” or thrust checks may be performed, but no direct adjustment
In those cases, standard 2-wheel alignment may suffice, though 4-wheel systems still measure thrust line.
8.2 Independent Rear Suspension / Adjustable Rear
Many modern passenger cars and SUVs use independent rear setups. These often allow adjustments in toe, camber, sometimes caster. In such cases:
- A full 4-wheel alignment is essential
- Laser / computerized systems shine, because of subtle angles in modern suspensions
- Rear-to-front alignment interaction must be managed
8.3 All-Wheel Drive / 4WD / Performance Vehicles
AWD and performance vehicles place high demands on alignment symmetry. Even small deviations can:
- Cause torque steer
- Accelerate uneven tire wear
- Affect handling and stability
Thus, using a precise 4-wheel laser alignment is highly desirable.
8.4 Modified / Lowered / Custom Suspensions
Vehicles with altered ride heights, aftermarket components, or custom geometry may strain standard methods. In such cases:
- Laser systems help detect non-standard geometry and calibration deviations
- But expert technicians may still need custom judgment
9. Process Walkthrough: From Setup to Verification
Here’s a generalized alignment workflow, showing where laser/computerized vs standard methods differ.
9.1 Pre-Alignment Setup
- Park vehicle on level, calibrated alignment rack
- Confirm rack leveling & reference surfaces
- Mount sensors / targets (in laser systems)
- Remove wheel weights, ensure proper tire inflation
- Check suspension parts, tire conditions, steering components
9.2 Reference Calibration
Laser / Computerized:
- System establishes baseline reference plane
- Calibrates sensors, derives reference angles
Standard / Manual:
- Use string alignment or mirrors to define baseline
- Use manual gauges to set zero references
9.3 Initial Measurements
- Read camber, toe, caster on all four wheels
- Check thrust angle or rear axle direction
- In manual systems, repeat measurements by hand
9.4 Adjustment Phase
- Adjust rear toe / camber first (if applicable)
- Set thrust line / rear centerline
- Then adjust front camber, caster, toe relative to rear / vehicle centerline
- For laser systems, feedback guides adjustment in real time
9.5 Iterative Checks & Final Verification
- After adjustments, re-measure all angles
- Verify values are within manufacturer thresholds
- Optionally perform road test and re-check
- In computerized systems, print alignment report
9.6 Post-Alignment Documentation & Client Handover
- Provide alignment report (before & after)
- Record measurements in workshop logs
- Advise customer on alignment intervals / care
10. Calibration, Accuracy & Error Sources
Even the best system can falter if miscalibrated or misused. Key error sources include:
10.1 Sensor / Target Misalignment or Damage
In laser systems, if sensors or reflectors are knocked, misaligned, or dropped, readings may skew.
10.2 Rack / Surface Level Errors
If the alignment rack itself isn’t perfectly level, or if reference surfaces are warped, error propagates through the entire measurement set.
10.3 Technician Setup Error
Mounting sensors inaccurately, misplacing gauges, incorrect zeroing, or misinterpreting data can all introduce error.
10.4 Vehicle Weight & Ride Height Variations
Uneven loading, added weight, suspension sag, or ride height differences (left-to-right) can affect readings.
10.5 Temperature, Tire Pressure, Play in Components
- Tyre temperature or pressure asymmetry may shift alignment slightly
- Worn suspension components (bushes, ball joints) may introduce play
- Non-round tires or wheel runout
Calibration and careful setup are critical: computerized systems require periodic recalibration to maintain factory-level accuracy.
11. Cost, Time, and Business Considerations
From a business standpoint, workshop owners must balance investment, throughput, and customer satisfaction.
11.1 Capital vs Operating Cost
- Laser / computerized systems have high upfront costs (hardware, software, calibration)
- Standard methods cost less but limit capability
- Maintenance and calibration add ongoing costs
11.2 Throughput & Job Time
- Laser / computerized methods typically reduce job time, allowing more alignments per day
- Manual methods take longer — more adjustments, repeated measurement loops
11.3 Pricing & Value Perception
Customers may be willing to pay a premium for “laser 4-wheel alignment with printout” due to perceived precision.
Offering a documented “before/after alignment report” enhances trust and upselling potential.
11.4 Differentiation & Branding
If QuickTyreFix positions itself as premium, promoting “laser 4-wheel alignment” may attract discerning customers.
However, you should still offer lower-cost alignment for vehicles where it’s sufficient.
11.5 Risk & Warranty
- Sensor calibration drift could lead to misalignments
- Training and technician competence are critical
- Standard methods have fewer dependencies but rely heavily on human precision
12. Best Practices & Tips for Alignment Technicians
To ensure your alignments are accurate, repeatable, and high-quality:
- Routine Calibration: Calibrate laser or optical systems per manufacturer schedule.
- Proper Mounting: Ensure sensors or targets are securely and correctly mounted on each wheel.
- Rack Leveling: Regularly confirm the alignment rack’s surface and reference baseline integrity.
- Verify Suspension Condition: Before alignment, inspect and repair worn or loose components (bushes, tie rods, ball joints).
- Symmetrical Setup: Ensure the vehicle is centered, level, and weight evenly distributed.
- Document Before & After: Always record or print alignment values; clients appreciate transparency.
- Periodic Checks: After a road test, re-check critical angles.
- Technician Training: Offer ongoing training to understand system quirks, error modes, and manual override.
- Use Manufacturer Specs: Configure alignment spec data for each make and model.
- Communicate with Customers: Explain what alignment means, why certain methods cost more, and how it benefits tyre longevity and handling.